Having survived the (mostly imaginary) ordeals of purchasing the Ledger Nano S hardware wallet and a Trezor hardware wallet, I had to decide which to set up first.
Googling for guidance on this matter, I learned the Ledger Nano S requires a “third party wallet app”, but the Trezor Hardware Wallet does not because it has its own built in. Having no clue about what app to choose, and the recent troubling news that 3000 people bought a fake wallet on the App Store, I chose the Trezor because it requires fewer decisions from me.
Trezor directs you to attach the USB cable to the Hardware Wallet device, then plug it into your computer (or phone I guess), open a Web browser and go to trezor.io/start. I HIGHLY RECOMMEND you do this in the Chrome browser. It will save you set-up steps. And if you, like me, are freaked out by this exercise, fewer steps mean fewer opportunities to err.
I started in Firefox, then started over in Chrome to streamline the process (and prevent critical operator errors). I opened the Chrome browser, and cut-and-pasted the URL from Firefox into Chrome. There was a “Download Chrome Extension” prompt, which I clicked. A prompt to “Add App” appeared which I also clicked. A few minutes later a message stated it’s ready to use.
Then a prompt to “update Trezor’s firmware” appeared. It gave an explanation about improved security, so I clicked OK. After a few minutes it completed and requested to uplug and re-insert the Trezor Hardware Wallet device, which I did.
The Website recognized the newly updated device, and prompts to name the hardware device. Spontaneously inventing a 16 character name paralyzed me until I saw it can be changed later. I entered a mediocre name and continued.
After naming the device, a 1-page tutorial about the Wallet’s user interface appeared. I clicked through the “see more” links, but it all seemed pretty obvious. Clicking “Continue” prompts you to concoct a PIN for the device. Crypto blogs unanimously praise Trezor’s “easy” and “intuitive” user interface. I, however, found the interface very confusing. It is unlike ANY interface a normal person has experienced in regular non-tech life.
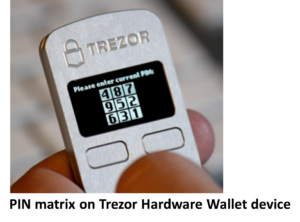
The instructions say “enter your PIN into the Trezor”. The Trezor device’s screen displays a weird matrix of numbers. The browser screen shows a blank matrix. ALL hard wallet bloggers raved about the importance of the physical keys on the Trezor hardware wallet. So is it stupid that I assumed to input the PIN using the physical keys on the hardware wallet? Well that’s NOT what you’re supposed to do. I even went back a screen and re-read the “Enter PIN” tutorial and NO WHERE does it instruct HOW to input the PIN. You’re supposed to naturally know somehow? At near nervous breakdown, I figured it out.
![]()
Whatever PIN you dreamed up, you need to reference the matrix on your Trezor Hardware Wallet device but you INPUT your dreamed-up PIN into the BLANK matrix on your Web Browser. You USE THE MOUSE FOR YOUR COMPUTER to click on the BLANK SQUARE that appears on your Trezor device screen.
For example: If the PIN you dreamed up was 1234 (Please don’t use 1234), according to the populated matrix on the Trezor device screen shown here, you would use your mouse and click on the BOTTOM RIGHT CORNER of the BLANK MATRIX on your Web browser first to indicate the 1. Then you would use your mouse to click on the MIDDLE FAR RIGHT square of the blank matrix in your Web browser to indicate the 2. Then you would use your mouse to click on the BOTTOM MIDDLE SQUARE of the blank matrix in your Web browser to indicate the 3. Do you want to guess how you would input the final PIN digit? If you said “Use your mouse to click on the TOP LEFT CORNER of the blank matrix in your Web browser to indicate the 4”, you’d be correct.
When you’ve input all of the digits of the PIN you dreamed up (and hopefully wrote down somewhere), use your mouse to click the big green ENTER button below the blank matrix in your Web browser.
The browser will prompt you to enter the SAME PIN a second time, but this time, the numbers are arranged differently on your Trezor Hardware Wallet device. So you would NOT click in the same places on the blank matrix to input the same PIN. That’s how the PIN entry protocol is so secure and why the bloggers were raving about it (but not adequately explaining it, IMHO).
Once you’ve twice successfully input the PIN you dreamed up, the screen on the Trezor Hardware Wallet device will show you a random word. This is the first word of your “recovery seed”. You need to get one of the “recovery seed” cards that (should have) accompanied your device and a reliable writing utensil. I advocate pencil because I have terrible handwriting and am paranoid and a bit commitment phobic. You will need to record each of the words IN ORDER onto the “recovery seed” card. I guess you could use any piece of paper but this step really needs to be taken seriously and you don’t want to make a transcription error (or mis-number the order of the words because the order the words appear is very important).
The Seed Words appear on the device’s tiny screen in a weird typeface that I found sometimes hard to read. Know that the words chosen will always be COMMON words. So if you’re trying to decide if the word is “ROBIN” or “RODIN” it’s pretty likely “ROBIN” like the bird. I highly recommend writing in BIG BLOCK LETTERS to avoid ambiguity. When you’re ready for the next word, you press the physical button on the device labeled “next”. The Trezor Hardware Wallet device runs through the 24 words a second time so you can double-check what you wrote down. When you’re satisfied all is well, you press the physical button on the hardware device that says “continue”.
Now the device is ready to move some coins into it. BUT before you do anything, write down those seed words onto the second Recovery Seed card. Use a reliable writing instrument, preferably fine tip, and ideally smudge-proof and water-proof. I believe the Fisher Space Pen satisfies these conditions. Sharpie makes an ultra-fine tip permanent marker that is a good option (and more readily available to purchase for most people than a space pen). The reason you get TWO Recovery Seed cards is because if you lose your device, you can buy a new device and repopulate the value using your PIN and RECOVERY SEED words. But if you lose your Recovery Seed words, you can never get your value back from a lost, stolen, or malfunctioning Trezor Hardware device.
Now I have to decide if I’m going to load coins onto this device or set up my Ledger Nano S wallet.